
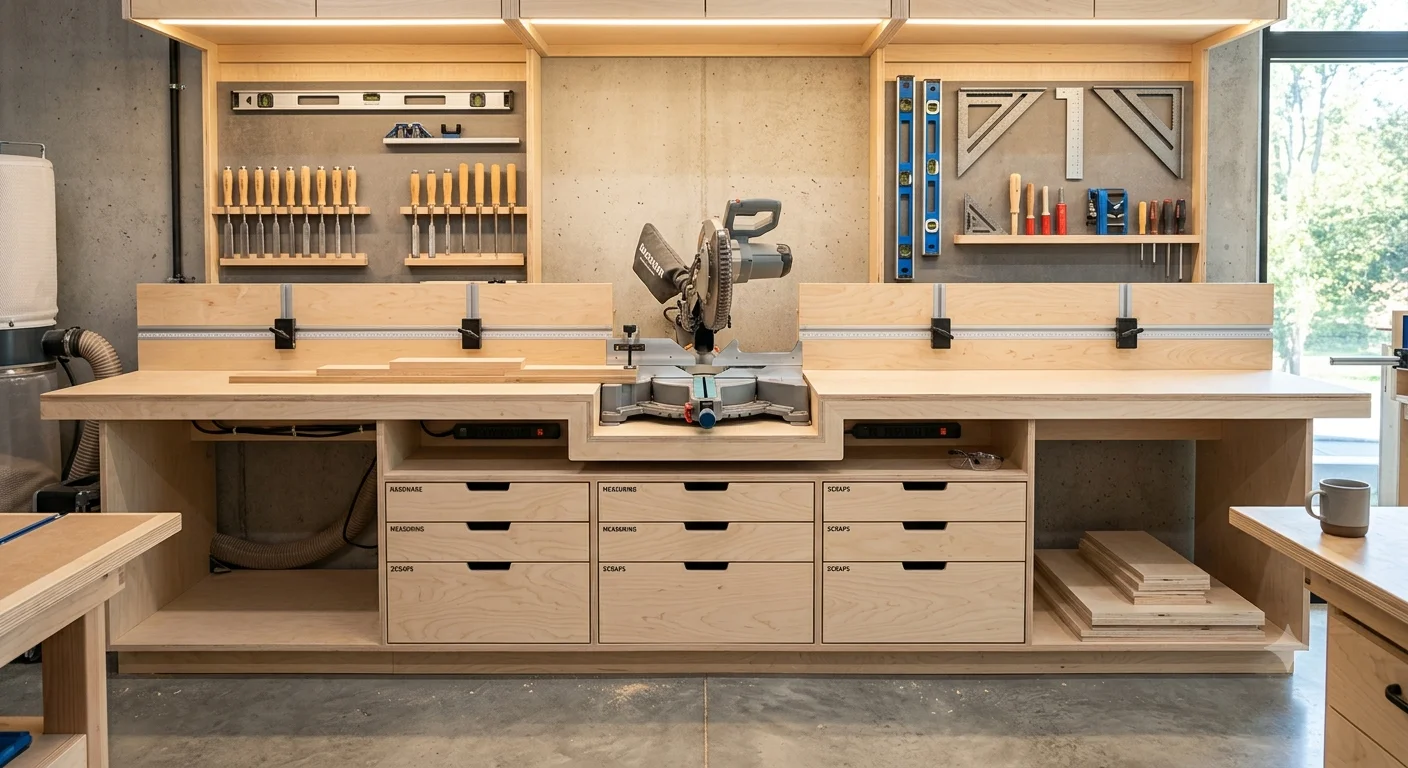
A dedicated saw station is often the single most transformative upgrade you can make to your woodworking shop. While a benchtop miter saw on a pair of sawhorses gets the job done for rough cuts, it creates a constant bottleneck when you need precise, repeatable crosscuts or clean support for long 8-foot or 10-foot boards. Building a dedicated workstation eliminates awkward board balancing, drastically reduces setup time, and integrates storage and dust control into one streamlined hub.
Whether you operate in a tight single-car garage or a sprawling multi-bay workshop, choosing or drafting the right saw station plans requires understanding critical layout mechanics from matching inset bed heights to setting up continuous fence alignment. This guide covers everything you need to know to design, build, and customize a high-performance saw station tailored to your tools and space.
What Is a Saw Station and Why Do You Need One?
A saw station (frequently called a miter saw bench or miter station) is an engineered workbench designed specifically to support a chop saw, compound miter saw, or sliding miter saw. Its defining feature is a recessed central drop platform flanked by flat support tables on the left and right. This setup ensures that lumber laid across the station rests completely flat against the saw’s turntable bed without sagging or bowing.
Core Advantages Over Temporary Setup
- Repeatable Accuracy: Integrated measuring tapes and flip-stop systems allow you to cut dozens of identical parts to exact length without picking up a tape measure twice.
- Superior Safety: Long boards remain self-supported throughout the cut, preventing dangerous binding, kickback, or sudden drops as wood separates.
- Integrated Dust Management: A stationary tool allows for permanent rear dust hoods and targeted vacuum suction, capturing up to 80-90% of airborne particles.
- Maximized Storage: The space beneath long support wings provides ideal real estate for shallow hardware drawers, deep tool bins, or roll-out scrap carts.
Comparing Saw Station Types

Before choosing a set of plans or buying materials, select the design layout that fits your available floor space and cutting demands.
| Saw Station Type | Ideal Workshop Size | Primary Advantage | Main Trade-Off | Average Material Cost |
|---|---|---|---|---|
| Wall-Mounted Fixed Cabinets | Large / Dedicated Shop | Maximum storage, absolute rigidity, longest continuous fence | Consumes permanent wall space | $350 – $750 |
| Mobile Rolling Workstation | Mid-Sized Garage Shop | Relocatable, heavy-duty locking casters, modular extensions | Requires smooth floor, slightly less overall wing length | $200 – $400 |
| Flip-Top Utility Cart | Small / Single-Car Garage | Shares footprint with a second tool (e.g., planer or sander) | Limited wing extension length, minimal drawer storage | $120 – $250 |
| Folding-Wing Compact Stand | Multi-Purpose / Shared Space | Wings fold down flat when not in use | Extra hinge maintenance, reduced cabinet storage | $150 – $300 |
Essential Dimensions and Layout Planning

The success of any DIY saw station comes down to accurate measurements before making your first cut. A fraction-of-an-inch error on the central recess height will result in uneven cuts or stock catching on the saw bed edge.
1. Determining Desk Height
Standard workbench height ranges between 34 inches and 38 inches, depending on your height.
- Stand comfortably with arms relaxed at your sides; bend your elbows at 90 degrees.
- The top surface of your support wings should sit roughly 2 to 3 inches below your bent elbow.
- For most woodworkers, a top surface height of 36 inches provides ideal leverage without bending your back during repeated cuts.
2. Sizing the Central Recess
Do not build a universal recess without measuring your exact saw model first.
- Width: Measure the maximum width of your saw base and add 2 to 3 inches on each side to allow fingers clearance when accessing bevel locks or mounting bolts.
- Depth: Measure from the rear projection (accounting for rear slide bars on sliding compound miter saws) to the front handle. Sliding saws can require 32 to 42 inches of depth clearance from the back wall.
- Drop Height: Measure from the bottom mounting foot of the saw to the metal cutting table top. Construct your drop platform so that:
Drop Platform Depth = Saw Table Height + Shim Allowance (1/8″)
Tip: Always build the drop deck 1/8″ lower than required, then use hardboard shims or leveling bolts beneath the saw feet to raise it perfectly flush with the side wings.
3. Outfeed and Infeed Lengths
In woodworking workflow, material flows primarily from left to right for right-handed woodworkers (or right to left depending on shop orientation).
- Infeed Side (Stock Entry): Aim for at least 5 to 8 feet of support wing to handle full 8-foot standard boards.
- Outfeed Side (Finished Cut): Aim for 3 to 5 feet of continuous wing equipped with a stop block system.
Key Features to Integrate Into Your Plans
Precision Fence & Stop-Block System

A raw wooden bench is only half a saw station. Installing an extruded aluminum T-track or dedicated fence system along the back wall turns it into a high-precision tool.
- Continuous Alignment: The rear fence of your wings must be aligned perfectly parallel and slightly behind the factory metal fence on the saw to avoid pinching stock.
- Self-Adhesive Measuring Tape: Stick self-adhesive steel measuring tapes onto the top of the fence or flush-mounted into a channel on the wings.
- Flip Stops: Use micro-adjustable flip stops that swing out of the way when making long cuts, then drop down for quick, accurate repeat cuts.
Effective Dust Collection Architecture

Miter saws are notorious for blowing fine sawdust straight out the back at high speed. A standard 1-1/4″ shop vac hose attached directly to the saw port catches less than half of this dust.
- Build an Enclosed Shroud: Enclose the rear area behind the miter saw with a sloped wooden hood lined with smooth hardboard or acrylic.
- Dual Vacuum Setup: Combine a 4-inch dust collection port at the bottom of the collection hood to capture heavy chips with a small 2-1/2-inch direct connection to the saw’s port for fine particulate suction.
- Sloped Collection Tray: Angle the floor beneath the saw toward a central drop chute so loose chips naturally slide into a vacuum inlet rather than accumulating behind the saw.
Under-Bench Drawer and Cabinet Storage

Utilize the hollow cavity under the wing support surfaces effectively by adding modular drawer banks or open shelving.
- Shallow Top Drawers (2″-3″ depth): Perfect for safety glasses, pencils, tape measures, stop blocks, speed squares, and extra saw blades.
- Deep Lower Drawers (6″-10″ depth): Excellent for storing heavy power tools, router bits, sanders, and pneumatic nailers.
- Vertical Blade Racks: Incorporate pull-out vertical organizers to store spare 10-inch or 12-inch circular saw blades safely without scratching carbide teeth.
Small Workshop & Mobile Alternatives

If floor space is tight, a 10-foot fixed cabinet run may not be feasible. Consider these compact alternatives:
1. The Rolling Flip-Top Stand
A flip-top cart mounts two tools back-to-back (such as a miter saw on one side and a thickener planer on the reverse) on a central rotating axle. When you need to crosscut lumber, rotate the miter saw to the top and lock spring-loaded steel pins into place.
2. Wall-Mounted Folding Wings
Attach drop-leaf table hardware or heavy-duty folding shelf brackets to the left and right of a compact rolling center cart. Raise the support wings when cutting long stock, then collapse them flat against the cart sides when storing the unit along a garage wall.
Essential Workshop Safety Considerations

Operating a stationary miter saw requires consistent safety discipline and a clean setup. When setting up your station’s fences, clamps, and hand-safety zones, ensure your layout adheres to standard OSHA woodworking machine safety standards to prevent kickbacks, stock binding, and accidental blade contact. miter saw on a integrated station requires consistent safety discipline.
Hand Safety Zones: Mark bright red or yellow warning bands on the support wing surfaces 6 inches away from the blade path on both sides. Keep your hands outside these marked boundaries during operation.
Secure Clamping for Small Cuts: Never hand-hold stock shorter than 8 inches near the rotating blade. Use hold-down toggle clamps integrated directly into your T-track system.
Dedicated Master Power Switch: Wire an easily accessible paddle-style safety switch on the front apron of the station to cut power completely when changing blades or adjusting fences.
Personal Protective Equipment (PPE): Always wear ANSI-approved eye protection, ear protection, and a fitted dust mask when operating your saw. Before plugging in your station or running high-draw vacuum accessories, double-check your motor circuits and tool clearances against official Power Tool Institute safety guidelines.
Frequently Asked Questions
What is a saw station?
A saw station is a dedicated workshop bench built around a miter saw or power cut-off tool. It features a recessed center platform that positions the saw’s metal bed completely flush with long side support wings, allowing for accurate, supported crosscuts and integrated material handling.
How high should a saw station be?
The ideal saw station surface height matches your standard workbench working height typically between 34 and 38 inches off the ground. A common standard is 36 inches, which allows most woodworkers to operate the saw controls comfortably without bending over.
Can I build an accurate saw station in a small garage?
Yes. If space is limited, opt for a mobile rolling station with hinged, folding support wings or a flip-top utility cart. These designs provide full cutting support when active but collapse down to a compact 30″ x 36″ footprint for storage against a wall.
How do I align the support wings with my miter saw bed?
Build your recessed center deck 1/8 inch lower than the measured height of your saw’s base. Once the saw is placed in the drop deck, place hardboard or washer shims beneath the mounting feet until a long aluminum straightedge spans flat across both side wings and the saw table simultaneously.
What wood is best for building saw station cabinets?
Cabinet-grade 3/4-inch hardwood plywood (such as Baltic birch or maple cabinet ply) is ideal for carcasses and support tops because it stays flat and resists humidity changes. Structural framing can be reinforced with $2\times4$ dimensional lumber or torsion box ribs.
How do I control dust at a miter saw station?
The most effective approach combines an enclosed wooden dust hood built behind the saw with a dual extraction system: a 4-inch port at the hood’s base to catch falling chips and a 2-1/2-inch hose attached directly to the saw’s dust port for fine dust extraction.
Should I attach my saw station fence directly to the saw’s metal fence?
No. Never bolt a custom wooden fence directly to your saw’s factory fence, as this can twist the saw bed out of alignment. Instead, mount independent fence tracks onto the left and right support wings, setting them approximately 1/32 inch behind the factory metal fence line.


Leave a Reply