
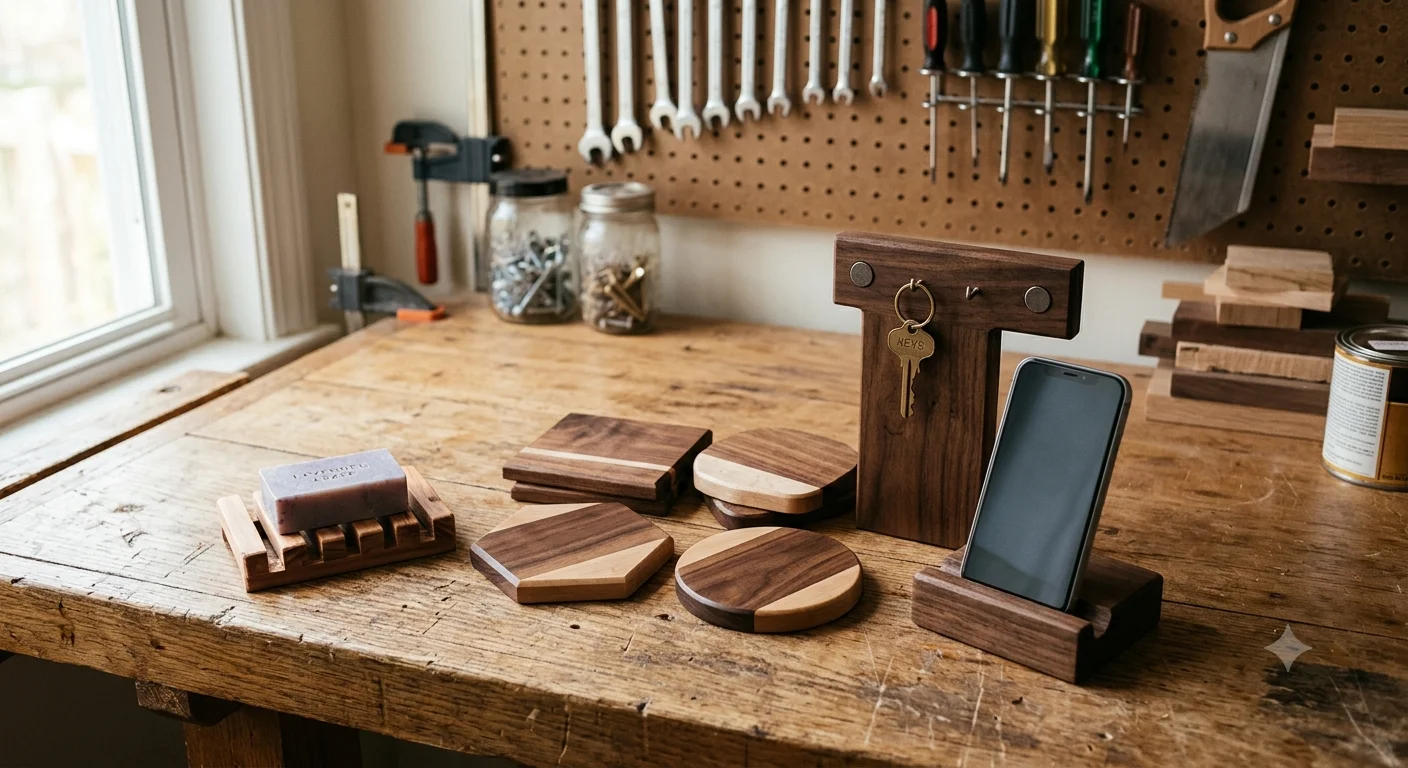
Every woodworking endeavor leaves behind a stack of offcuts, short boards, and awkward plywood remnants. Instead of letting these materials collect dust in a corner or tossing them into the waste bin, you can convert them into functional, attractive items for your home. Working with smaller timber pieces offers a zero-stress environment to test new joinery methods, refine sanding procedures, and experiment with custom finishes.
Whether you have a pile of dimensional 2×4 fragments or thin sheet offcuts, engaging in scrap wood projects allows you to create high-value items for virtually no material cost. This guide explores creative scrap wood ideas, step-by-step beginner builds, functional workshop additions, and practical safety practices to help you clear out your scrap bin while honing your DIY craft.
Why Try Scrap Wood Projects?
Building with offcuts is one of the most practical habits a maker can develop. Here are the main benefits of working with leftover timber:
- Saves Money: High-quality hardwood and specialty plywood are expensive. Utilizing leftover stock maximizes your initial investment and eliminates the need to buy full sheets or boards for small builds.
- Reduces Workshop Waste: Repurposing offcuts keeps usable timber out of landfills and keeps your workspace organized and clear.
- Low-Risk Skill Building: Experimenting with complex cuts, router bits, or new stain finishes on scrap material removes the fear of ruining an expensive piece of lumber.
- Ideal for Fast Builds: Smaller projects can often be completed in a single afternoon or weekend, providing quick, satisfying results.
- Custom Home Accents: Offcuts give you the freedom to build tailored organizers, decorative items, and personalized gifts that match your exact space requirements.
What Can You Make With Scrap Wood?

The table below outlines a variety of practical and decorative builds categorized by difficulty, estimated time, and recommended materials:
| Project | Difficulty | Approx. Time | Best For | Wood Needed |
| Chamfered Coaster Set | Beginner | 1 Hour | Table Protection | 1×4 Hardwood Offcuts |
| Minimalist Phone Dock | Beginner | 1-2 Hours | Nightstands & Desks | 2×4 or 2×6 Softwood |
| Geometric Wall Art | Intermediate | 3-4 Hours | Focal Wall Décor | Thin Strips & Plywood Backer |
| Modular Hexagon Planter | Intermediate | 2-3 Hours | Indoor Succulents | 1×6 Cedar or Pine |
| Tiered Desk Organizer | Beginner | 2 Hours | Home Office | 1/2″ Plywood & 1×3 Boards |
| Magnetic Key Rail | Beginner | 1.5 Hours | Entryways | 1×2 Hardwood Offcut |
| Tapered Bookends | Beginner | 1 Hour | Bookshelves | 2×4 or 4×4 Blocks |
| Slatted Soap Dish | Beginner | 45 Mins | Bathroom Counters | Teak or White Oak Scraps |
| Cookbook Stand | Intermediate | 2-3 Hours | Kitchen Countertops | 3/4″ Plywood & Small Trim |
| Serving Tray with Handles | Intermediate | 3 Hours | Entertaining | 1×3 Frame & 1/4″ Plywood |
| Raised Dog Bowl Stand | Intermediate | 2-4 Hours | Pet Owners | 1×6 Boards & 2×2 Legs |
| Wine Bottle Holder | Beginner | 1 Hour | Dining Room | 1×4 Hardwood |
| Bench Top Tool Caddy | Beginner | 2 Hours | Workshop Storage | 1/2″ or 3/4″ Plywood Scraps |
| Wooden Salt Cellar | Advanced | 3-4 Hours | Kitchen | Dense Hardwood Block |
| Candle Trivet | Beginner | 1 Hour | Living Room | 1×1 Hardwood Strips |
Best Scrap Wood Projects for Beginners

These detailed project breakdowns walk you through all the necessary steps, tools, and material requirements to kickstart your DIY builds. Beginners can also explore additional woodworking project ideas to find simple builds that match their available tools, materials, and experience level.
1. Chamfered Wooden Coaster Set
A simple, functional project that teaches precise square cutting and surface prep.
- Difficulty: Beginner
- Estimated Time: 1 Hour
- Best Wood Type: Walnut, Maple, or Oak 1×4 offcuts
- Tools Needed: Miter saw or hand saw, sandpaper (120/220 grit), sanding block, measuring tape, pencil.
Materials
- 4-6 pieces of 1×4 hardwood cut to 3.5″ x 3.5″
- Mineral oil or polyurethane
- Stick-on felt pads
Steps
- Measure and mark square 3.5″ x 3.5″ segments onto your hardwood offcut.
- Cut the pieces using a miter saw or fine-tooth hand saw.
- Sand all flat surfaces using 120-grit sandpaper, finishing with 220-grit for a smooth surface.
- Carefully bevel the top four edges of each coaster using a sanding block held at a 45-degree angle.
- Wipe away dust and apply two coats of food-safe mineral oil or protective sealer.
- Attach four small felt pads to the bottom corners of each coaster to protect furniture.
Finishing Tip: Contrast different wood species (such as alternating walnut and maple) across a set to create an elevated aesthetic.
Safety Tip: Secure small wood blocks with a hold-down clamp when making short cuts on power saws.
2. Angled Desktop Phone Holder
A compact, hands-free stand that keeps your device upright for charging or video calls.
- Difficulty: Beginner
- Estimated Time: 1-2 Hours
- Best Wood Type: 2×4 pine or Douglas fir offcut
- Tools Needed: Hand saw or miter saw, chisel or table saw/jigsaw, ruler, sandpaper.
Materials
- One 2×4 block (at least 5 inches long)
- Wood stain or clear coat finish
Steps
- Trim your 2×4 block to a clean 5-inch length.
- Mark a groove across the top face about 3/4″ wide, angled backward at roughly 15 degrees.
- Use a jigsaw or table saw to cut out the groove to a depth of 3/4″. Alternatively, make parallel hand saw cuts and clean out the channel with a sharp chisel.
- Sand the inner groove thoroughly to ensure it does not scratch your phone screen or case.
- Round over the external edges using 120-grit, then smooth with 220-grit sandpaper.
- Apply a coat of stain, paint, or clear varnish.
Finishing Tip: Glue a small strip of thin felt inside the groove to provide a soft landing spot for your device.
3. Magnetic Entryway Key Rail
Keep your keys organized using hidden neodymium magnets installed inside a sleek wood block.
- Difficulty: Beginner
- Estimated Time: 1.5 Hours
- Best Wood Type: Dense 1×2 or 2×2 hardwood offcut (Cherry, Oak, Walnut)
- Tools Needed: Drill press or hand drill, Forstner bit (matching magnet diameter), tape measure, wood glue, clamps.
Materials
- One 10-inch length of 1×2 hardwood
- 3 to 4 strong Neodymium disc magnets
- Mounting hardware (keyhole slots or heavy-duty mounting tape)
Steps
- Cut the hardwood piece to 10 inches and sand all surfaces smooth.
- Flip the board to the backside and mark 3 or 4 evenly spaced locations along the center line.
- Drill holes using a Forstner bit at each mark. Crucial: Stop drilling about 1/16″ before breaking through the front face.
- Test magnet orientation, place a drop of epoxy or strong glue in each hole, and press the magnets firmly into place.
- Install keyhole hangers on the back or prepare the surface for heavy-duty adhesive strips.
- Sand the front face light-handed and apply a protective tung oil or wax finish.
Safety Tip: Handle rare-earth magnets carefully they can snap together suddenly and pinch fingers.
4. Minimalist Tapered Bookends
Weighted, modern accents designed to hold heavy book collections neatly on open shelves.
- Difficulty: Beginner
- Estimated Time: 1 Hour
- Best Wood Type: Heavy 2×4 or 4×4 softwood or hardwood blocks
- Tools Needed: Miter saw, sander, square, pencil.
Materials
- Two 6-inch lengths of 2×4 or 4×4 lumber
- Non-slip rubber pads
- Paint or wood stain
Steps
- Cut two matching 6-inch blocks from your stock material.
- Mark an angled line along the side profile, starting 1 inch from the top edge down to the bottom corner.
- Make the bevel cut along the mark using a miter saw or hand saw to create a sleek, tapered wedge shape.
- Thoroughly sand all faces, working up to 220-grit.
- Apply paint, stain, or a bold color-blocked dip effect on the lower half.
- Stick rubber grips onto the bottom face to keep the bookends from sliding under pressure.
5. Slatted Bathroom Soap Dish
A self-draining wooden soap tray that prevents bar soap from getting mushy while adding a warm accent to your sink.
- Difficulty: Beginner
- Estimated Time: 45 Minutes
- Best Wood Type: Naturally rot-resistant timber like Teak, Cedar, or White Oak
- Tools Needed: Table saw or fine hand saw, wood glue, small clamps, sandpaper.
Materials
- 5 thin wooden slats (approx. 1/4″ x 1/2″ x 4″)
- 2 thicker base runners (approx. 1/2″ x 1/2″ x 3″)
- Waterproof wood glue (Titebond III)
Steps
- Cut your material into five upper slats and two bottom supporting runners.
- Lightly bevel or round the top edges of the slats with a sanding block.
- Space the two runners parallel to each other on your workbench.
- Apply small dabs of waterproof wood glue along the top of the runners.
- Lay the five slats perpendicular across the runners, maintaining a uniform 1/4″ gap between each piece for drainage.
- Clamp lightly and let the assembly cure for 24 hours before applying a coat of exterior-grade teak oil or waterproof sealer.
6. Desktop Pencil Holder & Station
A solid wooden block with custom-bored holes designed to keep pens, pencils, and small desk accessories tidy.
- Difficulty: Beginner
- Estimated Time: 1-2 Hours
- Best Wood Type: Solid 4×4 offcut or stacked 2×4 scraps
- Tools Needed: Drill, various size drill bits (or Forstner bits), sander, ruler.
Materials
- One 4×4 block cut to 4 inches in length
- Fine-grit sandpaper
- Wood stain or acrylic paint
Steps
- Square up your 4×4 block to a 4″ x 4″ cube shape.
- Layout a grid on the top end-grain face, marking drill centers spaced at least 3/4″ apart.
- Using a selection of drill bits (3/8″ for standard pens, 1/2″ or larger for markers), drill straight downward to a depth of about 3 inches.
- Vacuum out dust from inside the holes and roll up sandpaper to smooth the interior rims.
- Finish the block with clear spray lacquer or accent paint on the lower portion for a modern aesthetic.
Creative Scrap Wood Ideas for Home Décor

If you want to add warmth and texture to your living space, incorporating creative scrap wood ideas into your home décor is a budget-friendly option. By mixing different wood grain patterns, stains, and paint tones, simple offcuts can quickly become eye-catching wall features and display pieces.
+-----------------------------------------------------------------------+
|                     GEOMETRIC WOOD WALL ART LAYOUT                    |
+-----------------------------------------------------------------------+
|                                                                       |
|   +---------------------------------------------------------------+   |
|   | / / / / / / / / / \ \ \ \ \ \ \ \ \ \ \ \ \ \ \ \ \ \ \ \ \ \ |   |
|   |  / / / / / / / /   \ \ \ \ \ \ \ \ \ \ \ \ \ \ \ \ \ \ \ \ \  |   |
|   | / / / DARK / / /   \ \ \ \ LIGHT STAIN \ \ \ \ \ \ \ \ \ \ \  |   |
|   |  / / STAIN / / /    \ \ \ \ \ \ \ \ \ \ \ \ \ \ \ \ \ \ \ \   |   |
|   +------------------- PLYWOOD BACKER ----------------------------+   |
|   | \ \ \ \ \ \ \ \ \    / / / / / / / / / / / / / / / / / / / /  |   |
|   |  \ \ \ \ \ \ \ \ \  / / / PAINT ACCENT / / / / / / / / / / /  |   |
|   |   \ \ \ \ \ \ \ \ \  / / / / / / / / / / / / / / / / / / /    |   |
|   +---------------------------------------------------------------+   |
|                                                                       |
+-----------------------------------------------------------------------+- Geometric Mosaic Wall Art: Thin offcut strips sliced at matching 45-degree angles can be arranged on a thin plywood backing to form chevron, herringbone, or mountain-inspired geometric patterns. Staining individual strips in alternating light and dark shades creates depth.
- Floating Minimalist Picture Ledges: Small 1×2 and 1×3 scrap strips can be joined into an ‘L’ shape with a front lip to produce slender display shelves perfect for framed photos, postcards, and artwork.
- Rustic Layered Candle Trivets: Square 1×1 strips glued side-by-side with subtle elevation offsets provide a stylish base for glass candle jars or decorative centerpieces.
- Custom Wood-Framed Wall Mirrors: Reclaimed strips or small dimensional offcuts angled at the corners make rustic, textured frames for small circular or rectangular mirrors.
- Planter Box Enclosures: Short cedar or pine 1×4 pieces joined at the corners convert plain plastic plant containers into warm, natural indoor planters.
DIY Scrap Wood Projects That Are Actually Useful

Beyond decorative accents, functional builds solve everyday organization problems around the house. When designing DIY scrap wood projects, focusing on practical utility yields high-value items out of simple scrap pile materials.
- Under-Cabinet Spice Racks: Small strip offcuts assembled into shallow tiered trays keep kitchen spice jars visible and easy to access inside cabinets.
- Wall-Mounted Coat & Hat Racks: A sturdy piece of 1×4 or 2×4 scrap, fitted with metal hooks or wooden peg offcuts, creates a heavy-duty entryway hanging spot.
- Desktop Monitor & Laptop Riser: Elevate screens to eye level by attaching simple 2×2 leg blocks to a short, wide length of 3/4″ scrap board or plywood. This creates extra storage space underneath for keyboards and notebooks.
- Cookbook & Tablet Stand: A 3/4″ board paired with a small front retention lip and a hinged rear kickstand block holds recipes open and safe from countertop spills.
- Wooden Bookends with Integrated Pen Cups: Combining solid corner blocks with bored-out holder cups keeps study desks organized.
Waste Plywood Craft Ideas

Plywood scraps can be useful for a wide range of projects, but the appropriate type and thickness should be selected based on the intended use. For additional information about plywood types, applications, and specifications, see this plywood guide from APA.
+-------------------------------------------------------------+
|                RECOMMENDED PLYWOOD THICKNESS                |
+-------------------------------------------------------------+
| 1/4" THICKNESS : Wall art backers, drawer bottoms, trim     |
| 1/2" THICKNESS : Small desktop organizers, sides of trays   |
| 3/4" THICKNESS : Workshop jigs, shelf units, tool caddies   |
+-------------------------------------------------------------+- Layered Edge-Grain Coasters: Stacking and gluing multiple thin plywood pieces together then cutting across the glued stack reveals the striking, high-contrast striped pattern of alternating inner core layers.
- Flat-Pack Laptop Stands: Interlocking slots cut into two matching pieces of 1/2″ plywood scrap create a collapsible, portable laptop riser that requires zero screws or glue.
- Modern Stacked Storage Trays: Combine a 1/4″ sheet piece for the bottom with glued 1/2″ border strips to make low-profile catch-all trays for keys, jewelry, or office supplies.
- Geometric Wall Hanging Plaques: Paint distinct color-blocked geometric shapes onto smooth Birch plywood scraps to create clean, mid-century modern wall accents.
Note: Avoid using damaged, swollen, or delaminated outdoor plywood scraps, as moisture damage compromises structural strength and creates poor gluing surfaces.
Scrap Wood Projects by Skill Level
Choose projects tailored to your current tool set and comfort level:
| Skill Level | Required Capabilities | Typical Tools Used | Example Builds |
| Easy | Straight cuts, surface sanding, face-to-face gluing, basic nail/screw joining. | Hand saw, sanding block, drill/driver, wood glue, tape measure. | Flat coasters, basic key rails, simple trivets, wall pegs. |
| Intermediate | Accurate angle cuts, pocket holes, routed edges, countersinking screws, multi-piece assembly. | Miter saw, pocket-hole jig, router, orbital sander, clamps. | Geometric wall art, raised planter boxes, spice racks, trays with handles. |
| Advanced | Precise joint fitting (dovetails, box joints, mortise & tenon), resawing, fine grain matching. | Table saw, band saw, hand chisels, specialty hand planes, drill press. | Lidded keepsake boxes, salt cellars, complex edge-grain boards. |
Tools and Materials You May Need
You don’t need a professional workshop to start building with scrap material. Most projects require only a few fundamental tools.
+-------------------------------------------------------------+
|                    ESSENTIAL VS. OPTIONAL                   |
+-------------------------------------------------------------+
|  ESSENTIALS:                  OPTIONAL UPGRADES:            |
|  • Tape Measure & Pencil      • Random Orbital Sander       |
|  • Hand Saw or Miter Saw      • Compact Jigsaw              |
|  • Sandpaper (80/120/220)     • Pocket Hole Jig             |
|  • Wood Glue (Titebond II/III)• Router & Table              |
|  • Bar Clamps (At least 2)    • Drill Press                 |
+-------------------------------------------------------------+
Essential Beginner Tools
- Measuring Tape & Combination Square: Essential for accurate layout markings and checking that corners are square.
- Hand Saw or Miter Saw: A simple fine-tooth Japanese pull saw or a compound miter saw handles almost all crosscuts.
- Cordless Drill/Driver: Needed for pre-drilling pilot holes and driving fasteners.
- Assorted Sandpaper: Stocking 80-grit (coarse shaping), 120-grit (medium smoothing), and 220-grit (fine pre-finish smoothing) paper ensures clean surfaces.
- PVA Wood Glue: Liquid PVA glue creates strong joints that are often stronger than the surrounding wood fibers when properly clamped.
- F-Clamps or Bar Clamps: Clamping pressure is crucial for tight glue lines while adhesives cure.
Optional Workshop Upgrades
- Random Orbital Sander: Speeds up surface preparation across multi-piece projects.
- Jigsaw: Enables curved cuts, internal cutouts, and custom shapes.
- Pocket Hole Jig: Great for creating hidden screw joints in frames and box structures.
How to Choose the Right Scrap Wood
Not every piece of wood in your offcut bin is ready for immediate assembly. Inspecting materials beforehand ensures safer work and longer-lasting builds.
- Check for Warp, Twist, or Cupping: Sight down the edge of your boards. Excessively twisted or cupped lumber makes square joinery nearly impossible and can bind saw blades during cuts.
- Scan for Hidden Metal: Always run a visual check or use a low-cost metal detector over reclaimed lumber. Nails, staples, or broken screws will nick or ruin saw blades and present safety hazards.
- Select Solid Wood vs. Plywood Appropriately:
- Solid Hardwood (Oak, Maple, Walnut): Best for high-wear functional items like coasters, cutting boards, and tool handles.
- Solid Softwood (Pine, Cedar, Fir): Ideal for quick decorative boxes, planters, and wall features.
- Plywood (Birch, Oak): Excellent for flat backer panels, drawer dividers, trays, and shop storage jigs where dimensional stability is necessary.
- Inspect Grain Direction & Knots: Avoid placing structural cuts directly through large, loose knots that could pop out during drilling or saw operations.
How to Prepare Scrap Wood Before Building
Taking time to properly prepare your material makes assembly much easier later on.
+-------------------------------------------------------------+
|               SCRAP WOOD PREPARATION FLOWCHART              |
+-------------------------------------------------------------+
|                                                             |
|   [ 1. INSPECT ]       --> Check for knots, cracks, & hardware|
|             |                                               |
|   [ 2. CLEAN ]         --> Scrape off dirt, glue, or old paint|
|             |                                               |
|   [ 3. PLANE/FLATTEN ] -> Surface sand or plane faces flat  |
|             |                                               |
|   [ 4. SQUARING ]      --> Trim raw factory & offcut edges   |
|             |                                               |
|   [ 5. PRE-SAND ]      --> Sand individual parts to 120-grit |
|             |                                               |
|   [ 6. DRY-FIT ]       --> Test assembly without glue         |
|                                                             |
+-------------------------------------------------------------+- Decontaminate: Brush off loose dirt, grit, and old finishes using a wire brush or scraper to prevent dulling your cutting tools.
- Remove Hardware: Pull all old nails, staples, and broken screws from the board using pliers or a pry bar.
- Square Up Edges: Cut away split, rough, or checked board ends to establish clean, 90-degree reference faces.
- Pre-Sand Faces: Sand individual component surfaces down to 120-grit before final assembly, as inner corners are much harder to reach once glued together.
- Dry-Fit Components: Assemble all pieces without glue to verify fit, check alignment, and make sure your clamps are adjusted to the correct width ahead of time.
Safety Tips for DIY Scrap Wood Projects

Working with small lumber offcuts presents unique risks, particularly when holding small stock close to cutting blades. Always follow proper woodworking safety guidelines and use appropriate safety equipment when cutting, drilling, or sanding scrap wood.
- Wear Essential Safety Gear: Always wear impact-resistant safety glasses and a dust mask or respirator when cutting or sanding. Ear protection is required when operating power tools.
- Never Hand-Hold Small Pieces Near Blades: When trimming short offcuts under 6 inches on a miter saw or table saw, use push sticks, hold-down clamps, or a dedicated crosscut sled to keep hands away from the blade.
- Collect and Vacuum Fine Dust: Sanding releases fine airborne particulates. Work in a well-ventilated space or connect your sander to a vacuum filter system.
- Secure Workpieces Before Drilling or Routing: Never hold a small wooden block in your hand while drilling with large bits use a vise or clamp to prevent the wood from spinning.
- Oily Rag Disposal: Lay finish-soaked rags flat outdoors to dry completely before disposal. Never leave balled-up oil stain rags in a pile, as they pose a spontaneous combustion hazard.
How to Make Scrap Wood Projects Look More Professional
Simple steps can transform a basic project built from offcuts into a refined piece:
- Break Sharp Edges: Pass a high-grit sanding block over all exposed sharp edges to apply a subtle micro-bevel or round-over. This makes the finished piece feel smoother and helps hold paint and topcoats better.
- Fill Screw Holes and Gaps: Mix fine wood sanding dust with PVA glue to create a custom-colored wood filler for small cracks, or use matching wood plugs to conceal countersunk screw heads.
- Pay Attention to Grain Orientation: Arrange neighboring boards so their natural grain lines flow in harmony across faces and joint seams.
- Apply Multiple Thin Finish Coats: Avoid heavy single coats of varnish or paint that can leave drips. Lightly sand between thin applications using 320-grit sandpaper or fine steel wool to build up a smooth depth of finish.
- Incorporate Quality Hardware: Upgrading to solid brass screws, sleek metal handles, or low-profile rubber feet can instantly elevate the overall quality of your project.
Frequently Asked Questions
What can I make with leftover scrap wood?
You can create a wide variety of practical and decorative home items, including phone stands, coaster sets, key rails, wall-mounted display racks, desk organizers, candle holders, and simple storage boxes.
What are the easiest scrap wood projects for beginners?
The simplest projects include chamfered wooden coasters, angled phone docks, magnetic key racks, and tapered bookends. These builds require only basic straight cuts, light sanding, and simple finishes.
Can I make projects from small pieces of plywood?
Yes, small plywood scraps are ideal for geometric wall art, drawer dividers, shop storage jigs, tablet stands, flat-pack risers, and tray bases. Plywood provides excellent flat stability and clean edges when sanded well.
What tools do I need for DIY scrap wood projects?
Most basic projects can be built using simple tools: a tape measure, hand saw or miter saw, cordless drill, wood glue, bar clamps, and sandpaper. Specialized power tools like orbital sanders or table saws are helpful upgrades, but they are not strictly required for beginner builds.
Is scrap wood safe to use for home projects?
Scrap wood is safe as long as it is clean and untreated. Avoid using chemically pressure-treated lumber (often tinted green or marked with ink stamps) for indoor or food-contact items. Do not use pallet timber of unknown origin for cutting boards or utensils.
How do I prepare old wood before using it?
Inspect the timber for hidden metal fasteners, scrape away dirt or loose paint, trim off cracked end grain, plane or sand faces flat, and perform a dry-fit of your parts before final glue-up.
Final Thoughts
Transforming leftover offcuts into useful, attractive items is one of the most rewarding aspects of woodworking. Working with materials from your scrap bin allows you to learn new techniques, improve your cutting precision, and build custom items without spending money on new lumber.
Pick a project that matches your current skill level and available tools, prepare your materials carefully, and enjoy turning leftover timber into something built to last.


Leave a Reply